Creating iOS context menu with highlight and dim
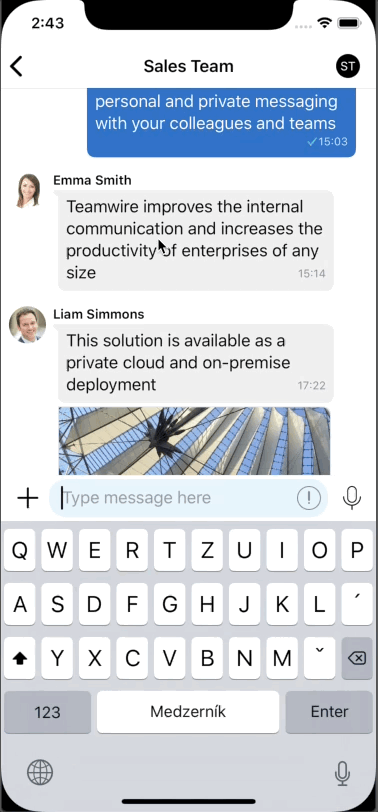
The iOS messaging application I work on features a context menu in the chat. You long-press any message in the chat and the context menu appears. This menu was originally implemented using the standard UIMenuController.
The UIMenuController is an old-style iOS API that is hard to use and does not work very well. In some situations tapping its items just did not call the assigned selectors and the menu did not work.
As part of the ongoing redesign of the application I decided to implement a new custom context menu that would look as the designer imagined and more importantly work reliably. I did not want to use any 3rd party library to keep it as simple and possible.
Using just UIKit I came up with a context menu with a dim effect and a highlight on the selected item
Here is how I approached building it.
1. New UIWindow
The first step was to create a new UIWindow and put it on top of the main application window. This was needed mostly to show the context menu as a standard UIViewController presented as .popover without dismissing the keyboard.
If you just create a new UIWindow and make it visible, it is shown under the keyboard window. To make it show above the keyboard window you need to set its windowLevel to a value higher that the windowLevel of the keyboard window.
This does not work as expected on iOS 11 and newer. The setter would not allow you to assign a value higher than the windowLevel of the keyboard window, it will be always 1 less.
The solution to this was to create a custom class inheriting from UIWindow and overriding the windowLevel getter with some hard-coded high value
final class MessageContextMenuWindow: UIWindow {
    // needed because just setting the level on iOS 11+ to be more than the keyboard does not work for some reason
    override var windowLevel: UIWindow.Level {
        get {
            return UIWindow.Level(rawValue: CGFloat.greatestFiniteMagnitude - 1)
        }
        set { }
    }
}
If you now create this window and make it visible, it will be shown on top of your main window without dismissing the keyboard, but it will be transparent for now
2. UIViewController with the original view snapshot
The next step was to create a UIViewController that will be shown in the new window.
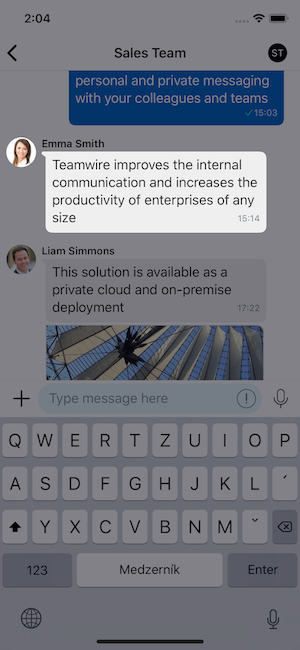
Dim effect
First I just set the background to some level of semi-transparent black
let backgroundDuration: TimeInterval = 0.1
UIView.animate(withDuration: backgroundDuration) {
    self.view.backgroundColor = #colorLiteral(red: 0.01568627451, green: 0.01568627451, blue: 0.05882352941, alpha: 0.5)
}
to get the dim effect

Highlighted original view
The next step was taking the original view, for example the contentView of the UITableViewCell and highlight it in this new UIViewController.
With focusedView as the original view I first created a snapshot from this view
guard let snapshotView = focusedView.snapshotView(afterScreenUpdates: false) else {
    return
}
This created a new UIView that is “flat” (no subviews) and looked exactly like the original view.
This snapshot view then needed to be added to the UIViewController
view.addSubview(snapshotView)
The trick here was to position it exactly over the original view in the main application window. To do this I needed to convert the position of the original view to the position in the UIViewController
guard let focusedViewSuperview = focusedView.superview else {
    return
}

let convertedFrame = view.convert(focusedView.frame, from: focusedViewSuperview)
snapshotView.frame = convertedFrame
With that you can now see the view highlighted
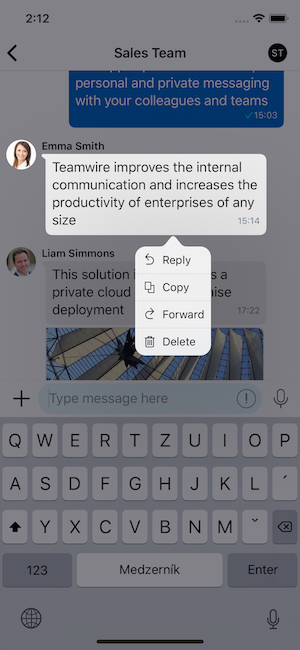
3. UIViewController shown as .popover
The final step was to show the actual context menu. I wanted to keep it simple so I just used an UITableViewController with fixed size
override func viewDidLoad() {
    super.viewDidLoad()

    tableView.reloadData()
    tableView.layoutIfNeeded()
    preferredContentSize = CGSize(width: 200, height: tableView.contentSize.height)
}
and presented it like a .popover
let vc = MessageContextMenuViewController(message: message)
vc.modalPresentationStyle = .popover
vc.popoverPresentationController?.delegate = self
vc.popoverPresentationController?.sourceView = snapshotView
vc.popoverPresentationController?.sourceRect = snapshotView.bounds
vc.popoverPresentationController?.backgroundColor = UIColor.white.withAlphaComponent(0.9)
present(vc, animated: true, completion: nil)
There are two important things here; properly positioning the popover and setting its delegate
extension MessageContextMenuWindowViewController: UIPopoverPresentationControllerDelegate {
    func adaptivePresentationStyle(for controller: UIPresentationController, traitCollection: UITraitCollection) -> UIModalPresentationStyle {
        return .none
    }
}
If you forget to set the delegate and override adaptivePresentationStyle the popover will be shown fullscreen.
4. The result
The context menu was now finished
See also
- I wanted async/await but I got a concurrency model
- Why I still build apps for myself
- Why I built my own expense tracker
- Beating App Store review: lessons from shipping a minimal indie game
- Building Aira: a calm anime tracker for myself