Creating a simple Windows 10 game with Win2D
Some time ago while looking at some pixel art work I got an idea to create a retro pixel art game for Windows 10. The choice was obvious, Sokoban. I have a very special relationship with the Sokoban game. The Delpi version of Sokoban was the first game I ever created. I later ported it to all the platforms I played with, namely J2ME (for my Siemens S60 phone), Linux (using Kylix which was basically a Delphi for Linux), Windows Phone 7 and now Sokoban Pixel for the Universal Windows Platform.
Win2D
I did not want to learn Unity and I considered it quite a overkill for such a simple game. Monogame seemed like an obvious choice, because my Sokoban for Windows Phone 7 was written in XNA. But Monogame requires too much ceremony to install and set up so I was not very eager to use it. I found Win2D. Win2D is an easy-to-use Windows Runtime API for immediate mode 2D graphics rendering with GPU acceleration. It is available to C# and C++ developers writing Windows apps for Windows 8.1, Windows Phone 8.1 and Windows 10. It utilizes the power of Direct2D, and integrates seamlessly with XAML and CoreWindow. This means you can create a normal XAML application, create all your non-gameplay screens in XAML and use Win2D just for the actual gameplay.
Initial setup and loading resources
To get started with Win2D just install the Win2D.uwp Nuget package and add a CanvasControl to your app. That’s it, no more setup required.
Before drawing any resources you need to first load them. This should be done in the CreateResources event of the CanvasControl. This method should not be async so if you need to load your resources asynchronously (as you always do) you need to use a trick with a separate method
private void canvasControl_CreateResources(CanvasControl sender, Microsoft.Graphics.Canvas.UI.CanvasCreateResourcesEventArgs args)
{
    args.TrackAsyncAction(CreateResourcesAsync(sender).AsAsyncAction());
}

private async Task CreateResourcesAsync(CanvasControl sender)
{
  //loading resources
  _playerBitmap = await CanvasBitmap.LoadAsync(sender, new Uri("ms-appx:///Assets/player.png"));
}
The code snippet also shows how to load a simple image as a resources. You probably will not need to load anything other that images in a simple game.
Drawing the game
To make the CanvasControl draw your game you need to hook up the Draw event and put all you rendering logic there. There are basically just two things you will want to render, text and images
void canvasControl_Draw(CanvasControl sender, CanvasDrawEventArgs args)
{
  args.DrawingSession.DrawText("Level:", 8, 8, Colors.Yellow);

  args.DrawingSession.DrawImage(_playerBitmap, new Rect(_playerPosition.X * size, _playerPosition.Y * size, size, size), new Rect(0, 0, 16, 16), 1, CanvasImageInterpolation.NearestNeighbor);
}
Both methods have many overloads so it is up to you to choose the one that suits you best. There are also other methods for drawing primitives like likes or circles, take a look at the documentation. When creating a pixel art game, make use you use the CanvasImageInterpolation.NearestNeighbor otherwise your images will look blurred if not on sufficient resolution.
Depending on the type of your game, you may need to refresh the game canvas periodically or just as a reaction to the user input. In both cases, just call Invalidate() on your CanvasControl.
Handling user input
If you want to make you game great on Windows 10, you need to handle a few different input methods because Windows 10 runs on a variety of different devices.
Keyboard and controller
First you should handle input from the keyboard, so the game is comfortably playable on a notebook or desktop PC. To do this, you can just subscribe to the KeyUp method of the current page or to the global Window.Current.CoreWindow.KeyUp event. Both events give you a VirtualKey that the user pressed and you just decide what to do.
If you want to make your game playable on the XBox One or on the PC with a XBox One controller, you should handle the controller input. Handling the controller input is the same as handling the keyboard, you just check for different keys. The resulting code may look like this.
private void CoreWindow_KeyUp(Windows.UI.Core.CoreWindow sender, Windows.UI.Core.KeyEventArgs args)
{
  switch (virtualKey)
  {
    case VirtualKey.Left: //keyboard
    case VirtualKey.GamepadDPadLeft: //controller
      MoveLeft();
      break;
    case VirtualKey.Right:
    case VirtualKey.GamepadDPadRight:
      MoveRight();
      break;
    case VirtualKey.Up:
    case VirtualKey.GamepadDPadUp:
      MoveUp();
      break;
    case VirtualKey.Down:
    case VirtualKey.GamepadDPadDown:
      MoveDown();
      break;
  }
}
If you want to make your game run on XBox One and do not have an XBox One to test it, just get the XBox One controller, connect it to your PC with an USB cable and make sure the whole game is controllable and playable just with it, without the keyboard or mouse.
Touch devices
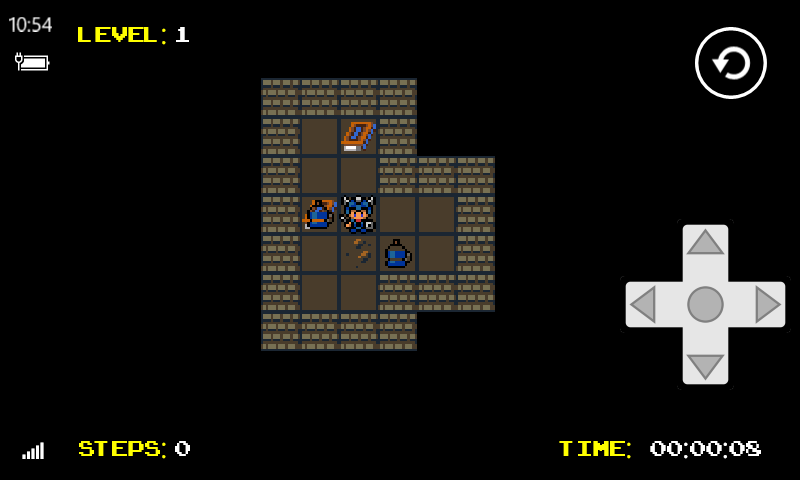
Making your game playable on a phone or on a tablet is a bit tricky. There are no input devices usually attached, so you have to come up with your own. There are many ways to handle this. You can recognizes swipes on the device, or make the user tilt the device. But the solution I like the best is to render a simple d-pad in the right corner of the screen. This way the user can hold the device in both hands and use the right thumb to play the game.
Conclusion
When building a simple 2D game for Windows 10, making it a UWP app and use Win2D. The Win2D framework is easy to work with and embed into UWP apps.